> ## Documentation Index
> Fetch the complete documentation index at: https://docs.trycrust.ai/llms.txt
> Use this file to discover all available pages before exploring further.
# Customizing the Snippet UI/UX
> Learn how to use the AI Prompt and other tools to design and customize the appearance and layout of your Crust AI snippets.
**Design Freedom**\
One of the core strengths of Crust AI is its design flexibility. Unlike many tools that restrict you to predefined components or layouts, Crust AI allows you to achieve virtually any design you envision for your snippets. This enables you to create truly custom, branded experiences for your end-users, presenting your data in the most effective and visually appealing way possible.
## Designing with Natural Language: The AI Prompt
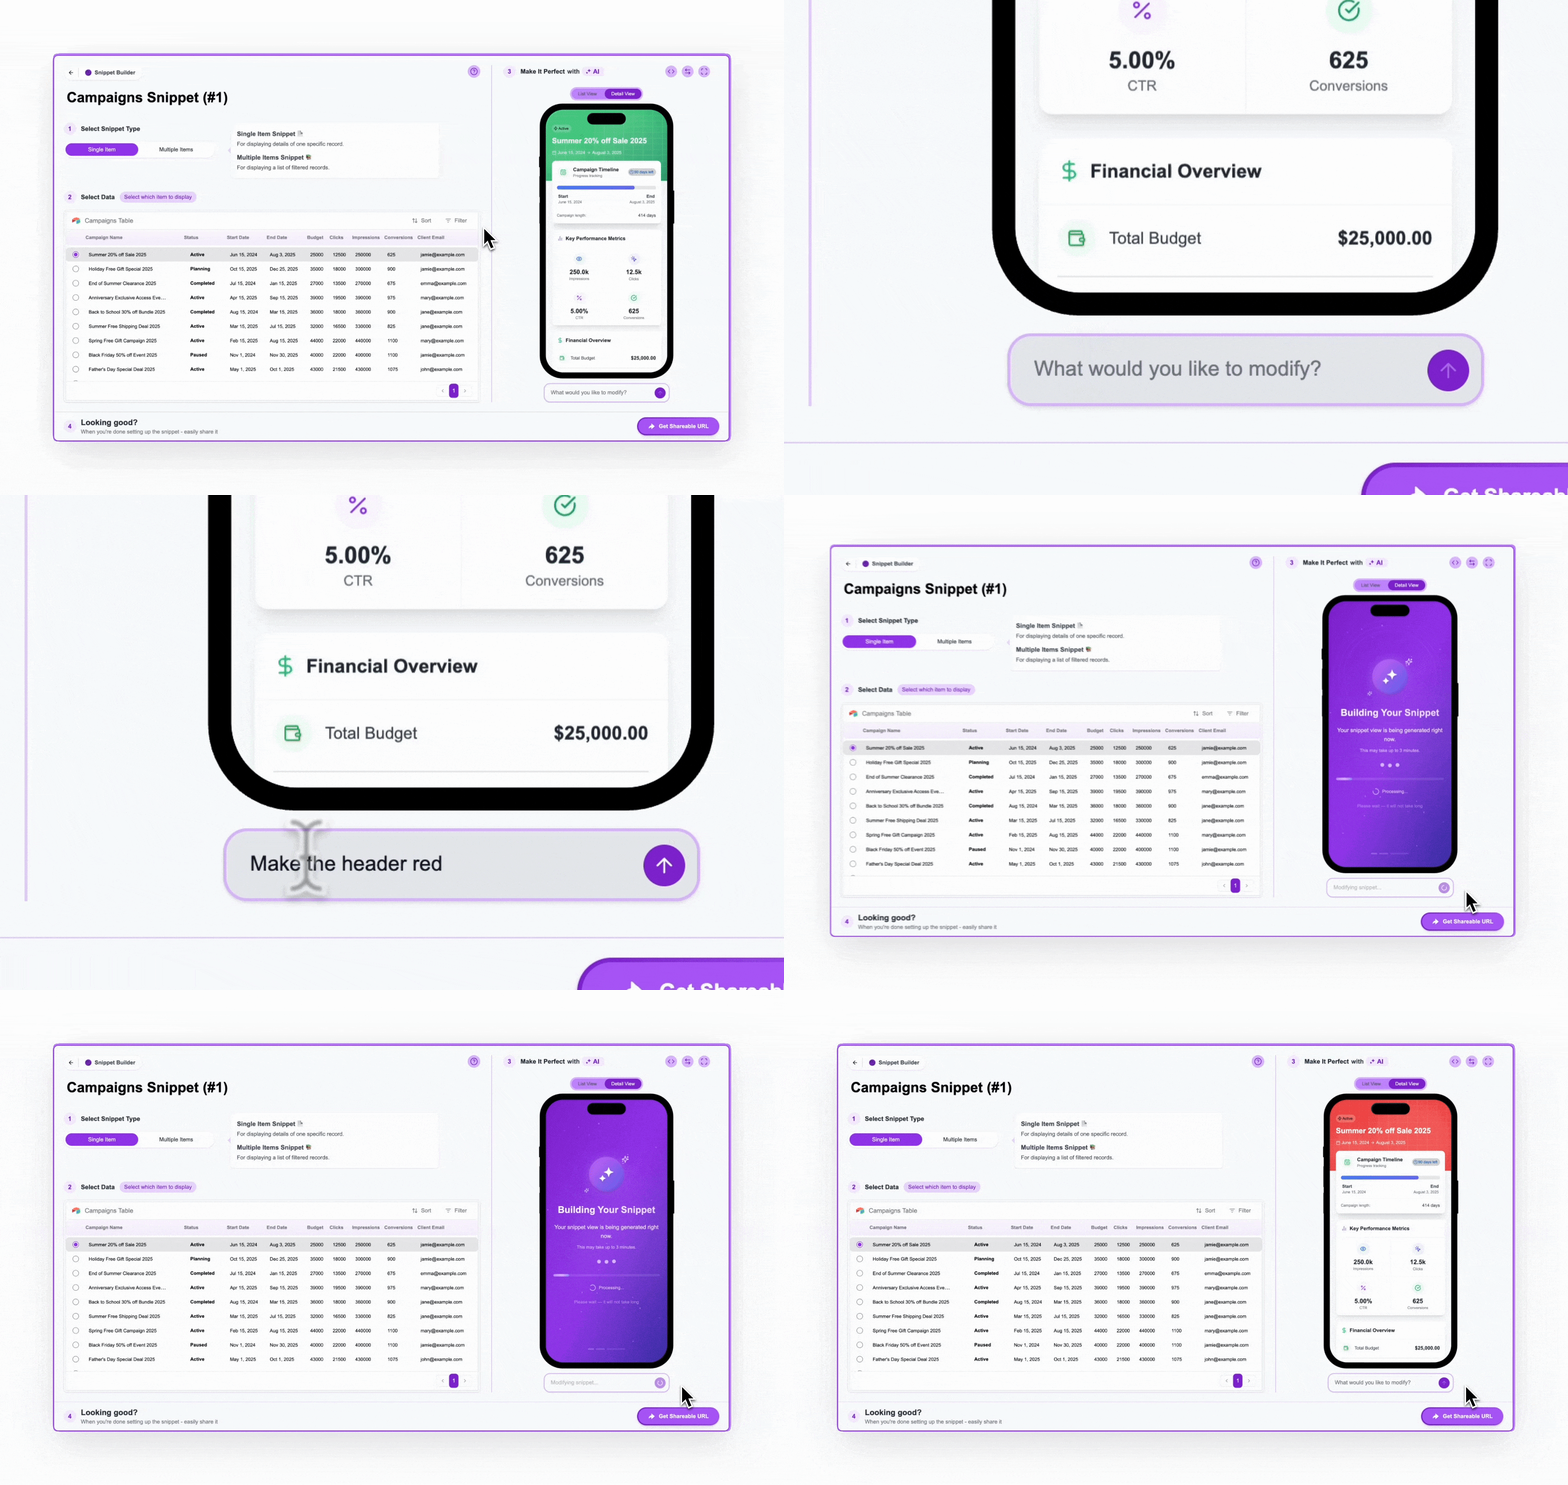
The primary method for customizing the design and layout of your snippet is through simple, natural language instructions using the **AI Prompt**. You'll find this prompt input field in **Step 3 ("Make It Perfect")** of the Snippet Builder, located directly below the live phone preview.
***
## What Can You Customize via Prompt?
The AI prompt is powerful and can handle a wide range of requests related to the snippet's appearance and user interaction:
#### Visual Styling
Change colors, texts, sizes, spacing, borders, backgrounds, icons, etc.
**Example Prompts:**
```text theme={null}
Change the header background to red
```
```text theme={null}
Make the campaign budget value bold and use a larger font size
```
***
#### Showing/Hiding Fields
Control which fields from your table are visible within the snippet.
**Example Prompts:**
```text theme={null}
Hide the 'Internal Notes' field
```
```text theme={null}
Show the 'Last Updated' field below the campaign status
```
***
#### Incorporating Schema Changes
If you add a new field to your table *after* initially creating the snippet, you can instruct the prompt to include it in the display. (Remember to potentially refresh the builder page or schema first so Crust AI recognizes the new field).
**Example Prompts:**
```text theme={null}
Add the 'Campaign Manager Photo' field next to the Campaign Name
```
***
#### Layout Adjustments
Change how elements or records are arranged.
**Example Prompts:**
```text theme={null}
Display the campaigns in a grid view with 2 columns instead of a list
```
```text theme={null}
Move the 'Client Contact' section above the 'Billing Overview'
```
***
#### Conditional Rendering & Styling
Apply specific styles or show/hide elements based on the data within a record. Crust AI understands your data structure and can apply logic.
**Example Prompts:**
```text theme={null}
If the 'Status' field is 'Completed', make the header background green. If the 'Status' is 'Failed', make the header background red.
```
```text theme={null}
Only show the 'Request Revision' button if the 'Status' is 'Pending Approval'
```
***
#### Adding Interactive Elements
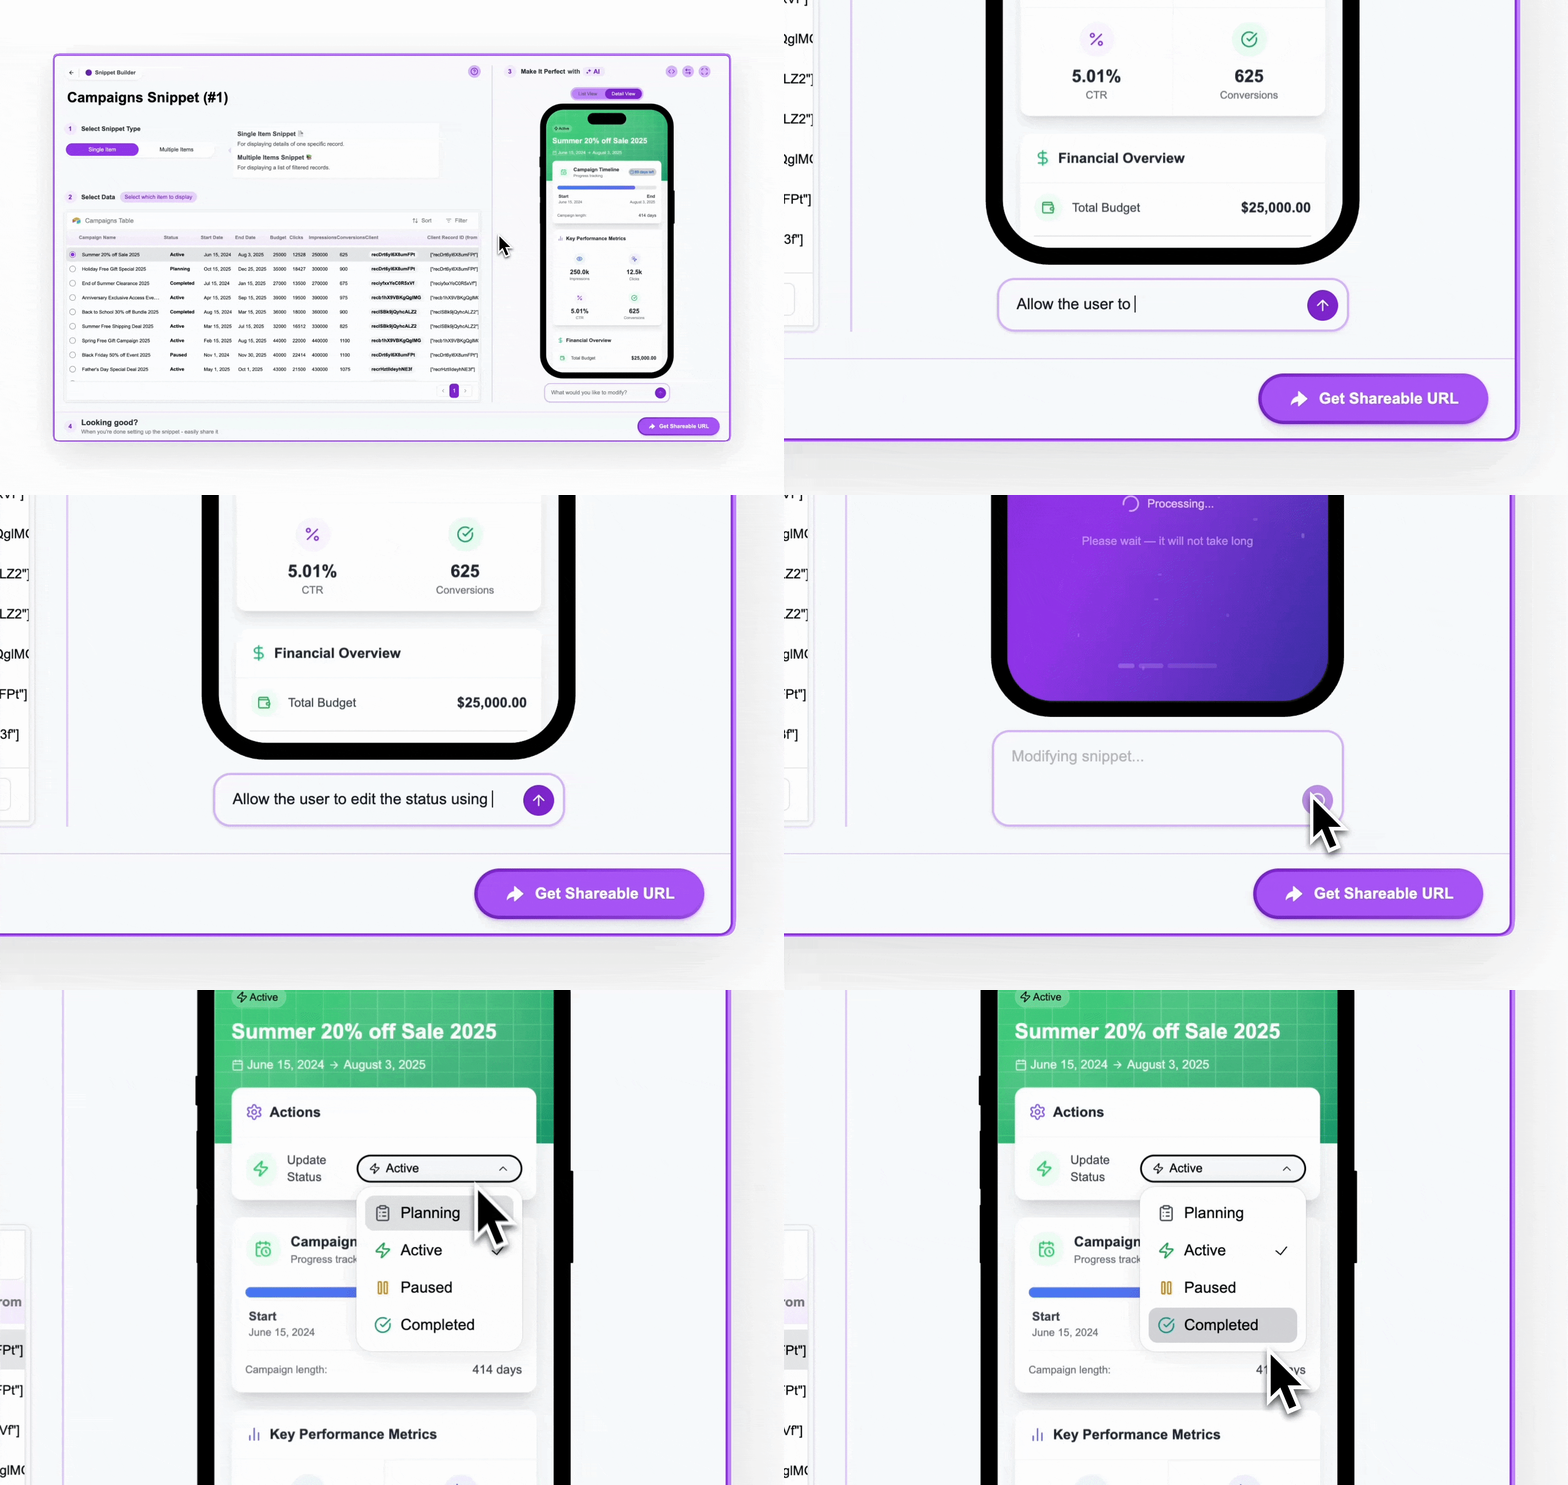
Instruct the AI to add buttons, checkboxes, dropdowns, or other elements that allow users to interact with the data (e.g., update fields).
\
*Learn more:* [Adding Interactive Elements to Update Data](/chapters/update-data-and-trigger-actions/adding-interactive-elements-to-update-data)
**Example Prompts:**
```text theme={null}
Add a checkbox that allows the user to edit the 'Approved' field
```
```text theme={null}
Allow the user to update the status using a dropdown
```
***
## Tips for Effective Prompting
* **Be Specific:** Clearly state what element you want to change and how you want to change it. Instead of "Make it look better," try "Increase the spacing around the client name."
* **Use Accurate Field Names:** Refer to your data table fields by their exact names for the AI to understand correctly (e.g., use `'Client Email'` not just `'email'`).
* **One Change at a Time:** For complex modifications, it's often better to break down your request into smaller, sequential prompts rather than one very long instruction. Apply one change, check the preview, then apply the next.
***
## Important: Apply Prompts to the Correct View
**Multiple Items Snippet Consideration**\
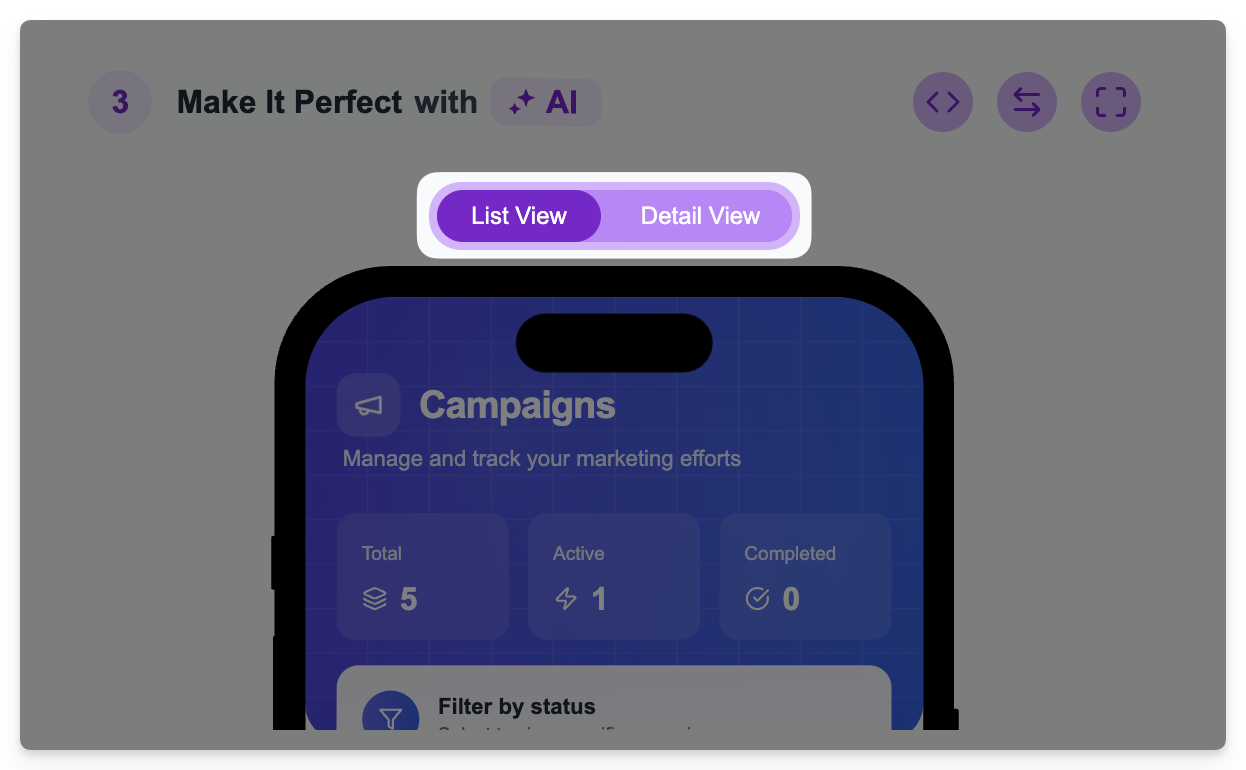
When working with a **Multiple Items Snippet**, remember that it has both a **List View** and a **Detail View**. The AI prompt applies changes *only to the view currently active in the preview* (Step 3).
***
## Important: Prompt Limitations
**What Prompts Cannot Do**\
While powerful for UI/UX, the AI prompt **only affects the snippet's presentation layer**. It **cannot** be used to:
* **Modify Data Schema:** You cannot add new fields, delete fields, or change field types in your underlying data source table using the prompt. This must be done directly in the data source (Airtable, Notion, etc).
* **Change Data Selection/Permissions:** The prompt cannot alter which records are pulled into the snippet. Filters, Sorting, and Permissions are configured exclusively in Step 2.
* **Alter Snippet Type:** You cannot change a snippet from Single Item to Multiple Items (or vice-versa) using the prompt; this is done in Step 1.
Think of the prompt as your way to style and arrange the data *after* it has been selected and filtered according to the rules set in Step 2.
***
By leveraging the AI prompt effectively, you can transform the default snippet layout into a highly customized and professional-looking mini-application tailored to your specific needs and branding.
 ***
## What Can You Customize via Prompt?
The AI prompt is powerful and can handle a wide range of requests related to the snippet's appearance and user interaction:
#### Visual Styling
Change colors, texts, sizes, spacing, borders, backgrounds, icons, etc.
**Example Prompts:**
```text theme={null}
Change the header background to red
```
```text theme={null}
Make the campaign budget value bold and use a larger font size
```
***
#### Showing/Hiding Fields
Control which fields from your table are visible within the snippet.
**Example Prompts:**
```text theme={null}
Hide the 'Internal Notes' field
```
```text theme={null}
Show the 'Last Updated' field below the campaign status
```
***
#### Incorporating Schema Changes
If you add a new field to your table *after* initially creating the snippet, you can instruct the prompt to include it in the display. (Remember to potentially refresh the builder page or schema first so Crust AI recognizes the new field).
**Example Prompts:**
```text theme={null}
Add the 'Campaign Manager Photo' field next to the Campaign Name
```
***
#### Layout Adjustments
Change how elements or records are arranged.
**Example Prompts:**
```text theme={null}
Display the campaigns in a grid view with 2 columns instead of a list
```
```text theme={null}
Move the 'Client Contact' section above the 'Billing Overview'
```
***
#### Conditional Rendering & Styling
Apply specific styles or show/hide elements based on the data within a record. Crust AI understands your data structure and can apply logic.
**Example Prompts:**
```text theme={null}
If the 'Status' field is 'Completed', make the header background green. If the 'Status' is 'Failed', make the header background red.
```
```text theme={null}
Only show the 'Request Revision' button if the 'Status' is 'Pending Approval'
```
***
#### Adding Interactive Elements
Instruct the AI to add buttons, checkboxes, dropdowns, or other elements that allow users to interact with the data (e.g., update fields).
\
*Learn more:* [Adding Interactive Elements to Update Data](/chapters/update-data-and-trigger-actions/adding-interactive-elements-to-update-data)
**Example Prompts:**
```text theme={null}
Add a checkbox that allows the user to edit the 'Approved' field
```
```text theme={null}
Allow the user to update the status using a dropdown
```
***
## What Can You Customize via Prompt?
The AI prompt is powerful and can handle a wide range of requests related to the snippet's appearance and user interaction:
#### Visual Styling
Change colors, texts, sizes, spacing, borders, backgrounds, icons, etc.
**Example Prompts:**
```text theme={null}
Change the header background to red
```
```text theme={null}
Make the campaign budget value bold and use a larger font size
```
***
#### Showing/Hiding Fields
Control which fields from your table are visible within the snippet.
**Example Prompts:**
```text theme={null}
Hide the 'Internal Notes' field
```
```text theme={null}
Show the 'Last Updated' field below the campaign status
```
***
#### Incorporating Schema Changes
If you add a new field to your table *after* initially creating the snippet, you can instruct the prompt to include it in the display. (Remember to potentially refresh the builder page or schema first so Crust AI recognizes the new field).
**Example Prompts:**
```text theme={null}
Add the 'Campaign Manager Photo' field next to the Campaign Name
```
***
#### Layout Adjustments
Change how elements or records are arranged.
**Example Prompts:**
```text theme={null}
Display the campaigns in a grid view with 2 columns instead of a list
```
```text theme={null}
Move the 'Client Contact' section above the 'Billing Overview'
```
***
#### Conditional Rendering & Styling
Apply specific styles or show/hide elements based on the data within a record. Crust AI understands your data structure and can apply logic.
**Example Prompts:**
```text theme={null}
If the 'Status' field is 'Completed', make the header background green. If the 'Status' is 'Failed', make the header background red.
```
```text theme={null}
Only show the 'Request Revision' button if the 'Status' is 'Pending Approval'
```
***
#### Adding Interactive Elements
Instruct the AI to add buttons, checkboxes, dropdowns, or other elements that allow users to interact with the data (e.g., update fields).
\
*Learn more:* [Adding Interactive Elements to Update Data](/chapters/update-data-and-trigger-actions/adding-interactive-elements-to-update-data)
**Example Prompts:**
```text theme={null}
Add a checkbox that allows the user to edit the 'Approved' field
```
```text theme={null}
Allow the user to update the status using a dropdown
```
 ***
## Tips for Effective Prompting
* **Be Specific:** Clearly state what element you want to change and how you want to change it. Instead of "Make it look better," try "Increase the spacing around the client name."
* **Use Accurate Field Names:** Refer to your data table fields by their exact names for the AI to understand correctly (e.g., use `'Client Email'` not just `'email'`).
* **One Change at a Time:** For complex modifications, it's often better to break down your request into smaller, sequential prompts rather than one very long instruction. Apply one change, check the preview, then apply the next.
***
## Important: Apply Prompts to the Correct View
***
## Tips for Effective Prompting
* **Be Specific:** Clearly state what element you want to change and how you want to change it. Instead of "Make it look better," try "Increase the spacing around the client name."
* **Use Accurate Field Names:** Refer to your data table fields by their exact names for the AI to understand correctly (e.g., use `'Client Email'` not just `'email'`).
* **One Change at a Time:** For complex modifications, it's often better to break down your request into smaller, sequential prompts rather than one very long instruction. Apply one change, check the preview, then apply the next.
***
## Important: Apply Prompts to the Correct View
 ***
## Important: Prompt Limitations
***
## Important: Prompt Limitations